Pages

Showing posts with label recipe. Show all posts

Saturday, June 29, 2013

Our Cantina

Sometimes we like to invent new recipes. Here is one I thought up while snoozing on the train ride home from work. It utilizes ingredients that will almost always be on hand, since everything but the toppings can be stored in the pantry or the freezer.


Cantina Chicken and Couscous
Makes 5 servings
(Or 3 if your family eats like mine)

Ingredients:
1 C Mediterranean couscous blend
1 3/4 C water
1/4 tsp cayenne pepper, divided
1/2 yellow or red onion (or both combined)
1 clove garlic, diced
1 Tb olive oil
1 tsp Stubbs Spice Rub for chicken
1 chicken breast
1 can pinto beans, rinsed and drained
1 can diced tomatoes, drained. 
Fresh corn kernels, sliced off one cob. If using frozen, about 1/3 C kernels
1 fresh lime, washed and sliced into half moons

Toppings
Chalula sauce
1/2 fresh avocado, diced
grated cheddar cheese
fresh lime juice

Directions:
Bring 1 3/4 C water to a boil. Add the couscous blend reduce heat, cover and simmer for 18 minutes. Allow to rest with the lid on for a few minutes when done. Stir in a little olive oil and 1/8 tsp cayenne pepper.

Meanwhile:
Warm the olive oil in a large skillet on medium heat. Add diced onion, chicken and Stubbs spice rub and 1/8 tsp cayenne pepper. Sauté until no pink shows on the chicken. Add the garlic and the sliced limes and sauté another 2 minutes. Add the beans and the corn and cook another 3 minutes. Using a spoon, add the tomatoes in 3 batches to avoid over wetting the mixture. Continue to cook on low-medium heat for another 7 minutes, stirring occasionally. 

Serve over couscous and enjoy with toppings. If you like cilantro, that would taste good also. But I don't like cilantro, so I don't recommend it. 


A Quarter Century

So on Monday, Jared turned 25. GASP!!

We celebrated with lots of family, two days in a row. We got to see WWZ, which was extreme, frightening, and intriguing. Neither of us are really into the zombie scene, but we were entertained and pleased at the end. Some die-hard zombie fans wouldn't like this movie though since the zombies move uncharacteristically fast. I just thought it gave them an added frightening edge. I did get REALLY good as zombie impressions. Ask me to do it for you. I make Jared jump every time.

We finally had a chance to celebrate the way I had planned, on Wednesday. Although frustrated at the time, at not being able to make a special dinner and dessert on his actual birthday, good things come to those who wait. Check out the good things we ate.


 Jared loves pie. So we, meaning I, made a raspberry apple pie for dessert. While that was baking, we made dinner. Chicken cordon blue. Another of Jared's faves. He kept saying I could just buy the box kind, but seriously? No. I always opt for homemade when possible.


 Apple Raspberry Pie

Crust
Mix 2 1/2 C flour, 1/3 C sugar, 1/4 tsp salt. 
Cut in 1 C cold butter until it makes pea sized lumps.
Add 1/4 C ICE water until mixed, again use cutting technique to combine.
Roll out into 2 crusts.

Filling 
(adapted from Sur la Table)
8 apples, peeled, cored and sliced
1/2 C frozen raspberries
2 TB fresh lemon juice
4 TB unsalted butter
1/2 C sugar
3 TB all purpose flour
1 tsp cinnamon


Toss the apples and raspberries with the lemon juice in a large bowl. In a large skillet, melt 2 TB butter over medium high heat. Add half the fruit mixture and 1/4 cup of the sugar. Cook, stirring often for about 7 minutes, or until the apples are barely tender when pierced with a fork. Transfer to a large bowl or baking sheet, and add the remaining fruit, butter and sugar to the skillet, cooking for 7 minutes until barely tender. Let the filling cool completely, then sprinkle the flour and cinnamon over the filling and toss well to coat. 

Preheat your oven to 375 degrees. Lightly flour your work surface and first roll crust out. Using the rolling pin, transfer the first crust into the bottom of the pie pan and pierce with a fork. The crust should hang slightly over the edges. Next, gently spoon the filling into the crust. Roll out second crust, and again using the rolling pin, gently lay the second crust on top of the filling. Trim the edges of the crusts and press them together using a fork. Slice a few holes in the top crust to let steam escape as the pie bakes. 

Bake for 20 minutes at 375 with foil around the edges. Then turn the heat down to 350 degrees, remove the foil and bake another 30 minutes, or until lightly golden brown. 

Let cool before serving. This allows the pie to hold its shape, and it wont ooze as it does in the above picture (we didn't want to wait). 

Note. We made this pie on Wednesday. Today is Saturday and there is only one piece left. Jared last night said, "I love pie for every meal." And that's how he's been having it.


 Chicken Cordon Blue
from Better Homes and Gardens cookbook
adapted to make 2 servings and fit our needs

2 chicken breasts
2 slices quality ham (about 1/16 in thick)
2 slices swiss cheese (about 1/24 in thick)
butter

IKEA gravy sachet
Fresh steamed broccoli and cauliflower

Lay out a piece of plastic wrap, put the chicken breasts on it, and cover with an additional piece of plastic wrap. Pound the chicken breasts flat, and attempt to do this into the shape of a rectangle, with the smooth edge of a meat mallet. If you don't have one, a wooden spoon also works. 
Remove plastic wrap and place ham and swiss on top of flattened chicken.
Roll chicken up and secure with a toothpick. Note, if you don't have a tooth pick, pieces of raw spaghetti noodles also work. 
In a hot skillet, melt some butter and cook the chicken breasts until the juices run clear and there are no pink spots left in the chicken. Note, we cooked on low-med heat covered with a lid for the first 10 minutes. Then we removed the lid and turned up the heat to give it a nice brown crisp, about another 10-15 minutes. 

Serve with veggies and gravy. Don't forget to remove the toothpicks before eating.  If you use spaghetti noodles, you can eat them. 


Thursday, June 6, 2013

Buffalo heat

picture credit tablespoon.com
Last night was Buffalo night at the Holloway house. University of Buffalo ranks as a top contender for dental school for us. Of course, we are only just in the beginning stages of applications, but still--you have to have dreams. I figured, on the chance that we get in there, we (meaning I) will have to learn to like Buffalo sauce. Buffalo wings were invented there, and in fact, locals just call them chicken wings. Calling them Buffalo wings brands you as an out-of-towner.

For dinner, we made Buffalo roasted cauliflower and Buffalo bleu cheese chicken pizza. Talk about a lot of Buffalo sauce--we went through 3/4 of a bottle of Franks buffalo sauce during this one meal. The pizza was delicious, but unfortunately, I made the roasted cauliflower wrong, so they were so hot and buffalo-y that we could barely eat them. It was fun  to try something new though, and we will have to make them again--the right way this time. Haley made them for us once during General Conference and they were delicious.

Jared has been devoted to shadowing and the dental school applications over the last week. He often comes home with gorey stories of people who have had their mouths bashed in with baseball bats and kids who have rotten candy teeth. Sometimes he smells like dental office....not my favorite smell in the world, but I'm sure I will one day come to love it. Or at least appreciate it.

I've been training for a triathlon again. I finally busted out my old bike and have started riding it to and from the train/work again. It's nice to feel the wind in my face again even if it is a short ride. I will have lots of weekends to take the bike down to the lake and ride around on the cycle paths there. I have yet to swim--the tricky thing is finding a pool not too expensive... but hey, I have until Sept 21 to get ready.

Evenings have started getting too hot again, I even broke down yesterday and turned on the air conditioner as soon as I got home. I always try to keep the air off for as long as possible, for two reasons 1. Saves money on electric bill. 2. Fresh air is good for you. But, there are times when I am extremely grateful we have AC. Like yesterday, when both my body and my mouth were sweating from the temperature and that Buffalo heat.


Tuesday, May 21, 2013

Blog Resurrected

Guess what!?!?!?!?!

I got a new computer. Finally. And it is awesome. And it is a Mac.

Jared said to me on Saturday, after purchase of said awesomeness, "Can I play with it a little bit too?"
I was always one, when after Christmas or a birthday, NO ONE, and I mean NO ONE, could play, touch or man-handle my new things until I had broken them in. I'm still like this. Perhaps not my best characteristic, but we all have things about ourselves that we are not proud of. So, sorry husband, you'll have to wait. I still love you.

Here is picture of me and my mum from the best Wednesday I've ever had. She came out to visit and we spent the whole day having a blast shopping, chatting, and laughing. I miss her already.

So, since I'm a foodie, and now I've got a great new computer, here is the most recent deliciousness we sampled. This is an old favorite my roommate used to make for our apartment, back when I was single.

White Chicken Chili 
makes 6 servings

Ingredients:
1 lb boneless, skinless chicken breast cooked and shredded
1 Tb olive oil
1 white onion, diced
4 cloves of garlic
8 oz diced green chiles
2 15 oz cans Great Northern beans
4 C water
1 Tb "Better than Bouillon" chicken base
2 tsp cumin
2 tsp dried oregano
1/2 tsp cayenne pepper
1 tsp salt
1 C plain yogurt


Toppings:
chopped tomato
diced avocado
1 C Monterey Jack cheese

Directions:
In a large dutch oven, or soup pot, heat oil on medium heat. Add the onions and garlic and sauté until translucent. Add the chicken, chiles, beans, cumin, oregano, cayenne pepper, salt, chicken broth (water and base mixed together). Simmer 30-45 minutes. Add the yogurt and cook another five minutes while stirring. Serve with cheese, avocado, and tomatoes. 

Note to chef: I boiled the chicken first, then reserved 4 cups of the water to use in the chili. 


And now for the  cornbread!
Preheat the oven to 400 F and place the cast iron skillet in the oven with 1 Tb butter. 

Sweet cornbread, tastes better than Jiffy+ cake mix
Ingredients:
1 C all-purpose flour
3/4 C cornmeal
2 Tb sugar
2 1/2 tsp baking powder
3/4 tsp salt
2 eggs, beaten
1 C milk
1/4 C canola

Directions:
In a medium bowl stir together the flour, cornmeal, sugar, salt and baking powder.  In separate, small bowl combine oil, eggs and milk. Add egg mixture all at once to flour mixture. Stir just until moistened. Pour batter into hot skillet. Bake for 15 to 20 minutes or until an inserted toothpick comes out clean. 


Also Haley came down from Logan so we could attend one of our best friends' weddings. This family has been our friends for the last 15 years or more so we were so happy to attend the wedding reception.
Sisters, sisters, never were there such devoted sisters

I'm gonna keep my eye on her


Saturday, September 29, 2012

Those Pretty Pumpkin Cakes

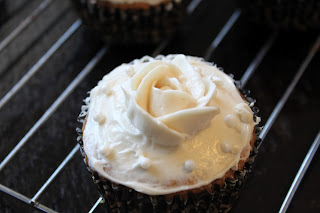
I made them twice, once to experiment and take pictures, the second time for the shower. My husband was delighted both times, since he has the title of Taste Tester # 1 in our household.

Pumpkin Cupcakes with Maple Cream Cheese Frosting
From SmittenKitchen

1/2 C Butter at room temperature
1 C dark brown sugar
1/3 C white sugar
2 eggs (large) at room temperature
 ******
2 C flour
2 tsp baking powder
1 tsp baking soda
1 tsp cinnamon
1/2 tsp nutmeg
1/8 tsp cloves
1/2 tsp salt
1/4 tsp black pepper

*******
1/2 C buttermilk + 1 tsp vanilla
1 1/4 C canned pumpkin
 *******
Preheat the oven to 350 degrees F and place cupcake liners in pan.


1. Beat butter and sugars together until fluffy.


2. Sift all the dry ingredients into a medium bowl.  


3. Add eggs one at a time to sugar mixture, making sure each is fully incorporated. 


4. Alternate adding flour mixture and milk mixture to the sugar mixture. Make sure to begin and end with flour. 


5. Beat in pumpkin until smooth.


6. Scoop batter into liners until they are 3/4 full. 


7. Bake until an inserted toothpick comes out clean, about 20-25 minutes. 


8. Cool completely before frosting. I saw this decorating technique on another website and decided I had to try to replicate. I was personally proud of the results.


Maple Cream Cheese Frosting

12 oz cream cheese, softened at room temperature
1/2 C butter, softened at room temperature
1 tsp maple extract
2 Tablespoons maple syrup
2-3 cup powdered sugar

Beat all ingredients together until smooth. Try not to eat too much of it so you have enough to frost with. 


My favorite cookie

Fall is here and winter is around the corner, I can feel it on the night air. One of the very best things about this season is cookies and hot chocolate.

These cookies are my personal favorite chocolate chip cookie. Not too thin, chewy, buttery, and filled with rich morsels of dark chocolate, high quality ingredients make the best chocolate chip cookies. All together, PERFECTION. Another reason they are my favorite, they are the ones mom always made on those cold afternoons while we kids were playing in the snow.

Argue if you will, but I'm sticking to it. I have made many other chocolate chip cookie recipes, as most people have done, and while I believe there are many recipes out there better than others, I also firmly believe that everyone has their own personal preferences. For example, my sister likes her chocolate chip cookies thinner than thin. Also, I think making chocolate chip cookies with shortening is a sin. I NEVER do that, even if the recipe calls for it. Gasp, oh no! She said she hates my favorite cookies. I'm not sorry. You can have more to yourself.

Do your own chocolate chip cookie hunt to find your favorite. I have learned in my research that the cookies taste better when your butter and eggs have been allowed to reach room temperature naturally. I also know that allowing the dough to rest overnight either in the fridge will help the flavors to soothe into eachother, making a richer and more flavorful cookie. Usually, I can't wait that long, and these cookies are delicious regardless. In your hunt for the perfect chocolate chip cookie, if you start here, you definitely will not have far to go.

From the tattered pages of my mom's Betty Crocker's The Cooky Book
revised to my preferences and presented for your enjoyment, ladies and gentleman!

THE Chocolate Chip Cookie

2/3 C Butter at room temperature
1/2 C Turbinado sugar
1/2 C packed dark brown sugar
1 egg at room temperature
1 tsp high quality vanilla
1 1/2 C all purpose flour
1/2 tsp baking soda
1/2 tsp salt
1/2 C chopped nuts (optional)
3/4 package Ghiradelli 60% cacao baking chips (Not optional)

Preheat your oven to 350 degrees F. In a large bowl, Blend butter and sugars together until light and fluffy. Add in the egg and vanilla and beat until well blended. In a separate, smaller bowl, stir the dry ingredients together, then blend into the sugar mixture slowly. Stir in the nuts and chocolate with a wooden spoon (better for licking later :) 

Drop by teaspoons full onto an ungreased cookie sheet. Bake 8-10 minutes, until delicately browned. I like mine at just 8 minutes, but this changes of course, depending on the size of your cookie. 


Makes 4-5 dozen 2 inch cookies. (According to the recipe. I must make mine too big because we usually get 3 dozen out of this recipe.)

Feeding the hard working and studious husband a well deserved late night snack.

WILL YOU COME DOWN TO DINNER!?!?!?!?

Please read the title of this like BEAST in the classic Disney film, Beauty and the Beast. Or even better, this version. It's a GEM.

Husband and I have started shouting this at each other when dinner is ready. All in good fun, and only occasionally in Hanger. There's a reason those books are called the Hunger Games. Full people don't have that much ambition.

On Sunday we had two friends over to dinner. I think that makes more sense that saying "for dinner" amiright? You're not eating the guests. I hope.


Sunday soup and bread has become a tradition. Especially because soup and bread make great leftovers on those weeknight's a woman is just too busy or tired to cook something new. The choice this Sunday? London Soup.


This is a family favorite that has been passed down between expats who have lived in London, and where the recipe originated. I can tell you is that this is the perfect soup for a cold, windy, rainy blustery day, when the tile/wood/flagstone floors feel cold under your feet, and a sweater provides only brief respite from the chill. This soup will warm you right up!

 Want me to prove it? Why do you think there are no pictures of the final product? We ATE it too fast for me to take a picture! Shoot. I'll just have to make it again and add pictures. Or you can make it yourself and let me know what you think.

LONDON SOUP
serves 4

INGREDIENTS
1/2 pound ground beef
3/4 c chopped onions
3/4 c thin sliced carrots
3/4 c thin sliced celery
1 tsp dried basil
1 tsp dried parsley flakes
butter or margarine
3 C beef broth
4 c diced, peeled potatoes
1/4 c flour or cornstarch
4 oz cheese (strong) shredded
1 1/2 c milk
3/4 tsp salt
1/2 tsp pepper

INSTRUCTIONS:

In 3 qt saucepan or dutch oven brown the meat. In the same pan, saute onions, carrots, celery, basil and parley in butter for about 15 minutes.

Add potatoes and add enough broth to cover the vegetables. Bring to a boil, reduce heat and simmer for about 15 minutes or until potatoes are tender. (We used yukon gold potatos and did not peel them.) 

Meanwhile, in a small saucepan melt 2 T butter and add the flour, cooking for 3-5 minutes or until it just starts to brown. Add the milk to the flour mixture, stirring until thickened. (I believe this only me about 3 minutes). Stir in cheese until melted and sauce is creamy and thick. Congratulations, you have just made what is called a roux, and it is often used in soups as a way of thickening them without adding heavy creams etc. I love rouxs!

Add the roux/sauce to the soup and cook and stir for 2 minutes, until fully incorporated. Add salt and pepper and serve with delicious bread. The cheesy flavor is so warm and cozy, but not heavy like you might expect. 


Wednesday, August 29, 2012

Tira My Sue


Birthdays are special in our family. They always have been, and they always will be. I have many fond memories of birthdays. Ice blocking when it failed to snow when I was 9. A tube party at Discovery Zone, dressing up like puppies and having a dog party (that one was my sister's but I imagined it to be mine...except I never got any presents...)

The last few years, I have thrown myself my own parties. When you get older and live away from home, sometimes you need to treat yourself. Or other people--we had a Bieber party for a roommate of mine a few years ago.

Since I love birthdays so much, I tend to go a bit overboard. Last year I made my husband (my then fiance a birthday cake extraodinaire. It cost me over $30 dollars to make, but eating it was worth every penny.

Yesterday we celebrated my MIL's birthday. The treat? Tiramisu. The food of the gods.


It took awhile to find the right ingredients, and we adapted the recipe a bit for budget purposes. Still. Heavenly. And it's currently in my fridge, calling out my name..."Alex, put a spoon in me and dig in. You ran home from the bus today. No worries. I'm delicious. EAT ME! "

TIRAMISU
Serves 6 (definitely not true. If you budget wisely, you can feed over 10 people)

2 egg whites
4 egg yolks
1 1/ cups powdered sugar
1 3/4 cup mascarpone cheese*
7 ounces lady fingers
3/4 cup freshly brewed, extra strong coffee, cooled**
7 ounces semisweet chocolate, grated
unsweetend cocoa powder, for dusting

Stiffly whisk the egg whites in a grease-free bowl. Beat the egg yolks with the sugar in another bowl until pale and fluffy. Gently fold in the mascarpone, then the egg whites. Make a layer of lady fingers on the base of a deep, rectangular serving dish and brush them evenly with coffee. (NOTE: we dipped the lady fingers and then placed them in a 8x 8 in glass baking dish)
Cover with a layer of the mascarpone cream and sprinkle with a little grated chocolate and cocoa powder. Continue making layers until all the ingredients are used. Ending with a layer of mascarpone cream. Dust with cocoa and chill in the refrigerator for about 3 hours, or overnight.

(Note: since this cream is made of raw egg and cheese, make sure you keep it refrigerated as much as possible; don't let it sit out too long or you may increase the risk of getting sick)


*we are poor college students. So we broke the Italian rule and used cream cheese blended with 1/2 cup fresh whipped cream. My husband nearly choked at my barbaric and monstrous suggestion. I think it still tasted great, but next time, I'll try it with the mascarpone.

**for those of you who are non-coffee drinkers I suggest using PERO. This is a non-caffenaited beverage popular in Europe, and less popular in the States. It is made of roasted chicory and barley rather than coffee beans. Similar in taste (I assume from the smell, since I've never drunk coffee myself) and I frequently use it as a substitute in the recipes I make that call for the stronger stuff.


Multigrain bread on the brain

Bread is good for you. Especially when it is homemade, and tastes like Germany. And has lots of whole grains in it. So what are you waiting for? Eat up!


Multi-Grain German Bread
original recipe inspired by the crusty crusts of the Alps

Difficulty level: beginner
Total time: 16 hours from start to finish. Don't let that frighten you, most of that time is rest/rise time. 


Ingredients:
4 1/2 cups of all purpose flour
1 cup whole wheat flour
1/4 cup of flax seeds
1/4 cup of wheat germ
1/4 cup of corn meal
1/2 t. instant or active-dry yeast
2 1/2 t. salt
2 2/3 c. cool water

 Directions:
In a large bowl, combine the flour, yeast, and salt. Add the water and stir until all the ingredients are well incorporated; the dough should be wet and sticky. You know it's done when the dough will begin to stick to itself instead of the bowl.  Cover the bowl with plastic wrap. Let the dough rest 13 hours on the counter at room temperature. When surface of the risen dough has darkened slightly, smells yeasty, and is dotted with bubbles, it is ready.

Lightly flour your hands and a work surface. Place dough on work surface and sprinkle with more flour. Fold the dough over on itself once or twice and, using floured fingers, tuck the dough underneath to form a rough ball.


Dust a cotton towel with flour so that the dough will not stick to the towel while it is rising. Place dough seam side down on the towel and dust with more flour.  Cover with the edges or a second cotton towel and let rise for about 2 hours, or until it has doubled in size.

When you reach the 1.5 hour mark of rising time, preheat your oven to 425 degrees F. You will need a 6-8 quart heavy covered pot, such as a cast-iron Dutch oven, to be in the oven as it heats. When the dough has fully risen, carefully remove pot from oven. Remove top towel from dough and slide your hand under the bottom towel; flip the dough over into pot, seam side up. The dough will straighten our as it bakes, but if it lands in the pot sideways, give it a slight shake to settle it. 

 Cover and bake for 40-50 minutes. Uncover and continue baking about 5-10 more minutes, until a deep chestnut brown. The internal temp of the bread should be around 200 degrees. You can check this with a meat thermometer, if desired. Another great way to check if bread is done is to give it a good knock/thump. If it sounds hollow; presto finito!

Remove the bread from the pot and let it cool completely on a wire rack before slicing. This bread will not rise very high in the oven, but it should bake up with a nice crackly crust nonetheless. 


Delicous as a toasty sandwich with salad. Or just plain with butter.


Feeling stressed? How about a pot of soup!

School started again for hubby this week. Work has been mayhem, but is finally calming down.

We settled on soup for dinner on Monday night. Was it delicious? Make it and try for yourself. Don't forget the bread.

All I can say is, BRING ON THE TRUMPETS!

http://youtu.be/zXU9Ur9QznE

ROASTED CARROT AND GARLIC SOUP
adapted from How to Cook Everything


1 1/2 pounds of carrots, peeled and cut into strips
1 pound of baby red potatoes cut in half
olive oil for drizzling
3 cloves garlic, smashed with the flat of your knife
2 tsp ground cumin
1 tsp ground cilantro
salt and pepper
2 1/2 Cups chicken broth
1 cup diced onions

1. Preheat the oven to 425 degrees F while you peel and cut the carrots and potatos. Place the vegetables in a large bowl and drizzle with the olive oil, then dust with the cumin, cilantro, salt and pepper. Spread them out onto a large baking sheet and place the smashed garlic on the baking sheet as well. Roast vegetables for about 35 minutes, or until starting to golden, they should be tender when pierced with a fork.

2. When the vegetables are done roasting, take them out of the oven, and try not to eat them all, they will smell divine and taste even better. Go ahead and have a sample, it will whet your appetite. To a medium saucepan, add 2 tsp olive oil, and the onions. Saute until they are soft. Add the chicken broth and the roasted vegetables (potatoes, garlic and carrots). Bring to a boil, then simmer for 5 minutes. 

3. Turn off the heat using either an immersion blender, or by pouring your soup into an upright blender, puree until smooth. (NOTE: Husband liked chunks of potato so if you think you will too, add the potatoes after you have pureed the carrots and the broth. This would work better in an upright blender) Blend in batches if need be.

4. Pour soup back into the saucepan and cook for another 5 minutes. I only do this to make sure the soup is piping hot, mostly I just bring up the temperature again. Serve the soup with walnuts and feta cheese. And of course, homemade multigrain bread.

Serves 4.

Trust me. You will NOT be disappointed in this recipe. The garlic makes it heavenly. I'm a huge proponent of garlic.

HAHAHAHAHA TRUMPETS!

Family Funnin and Foodin

This weekend marked the return of my sister to school at Utah State. She and my dad arrived after their cross-country drive from Maryland. We celebrated with dinner in Logan at the Beehive Grill. It was fairly good food, their special fry sauce was unique and delicious. I hear they have a rootbeer brewery, but we didn't sample. After an attempted barbeque with GPA and GMA, who had come down from Idaho to camp over the weekend, we returned to my sister's apartment discouraged: we had spent the last half hour driving around the campsite in the dark, looking for their camper. No luck.

It was not until the next day that we tried again. Saturday we ate and ate and ate. Episode 1. hotel breakfast; Dad apparently loves hotel eggs...why? No idea. I guess he likes the chewy, rubbery and runny feel of them in his mouth...? Gross. I like my eggs well done.

Episode 2. Kneaders. Hubby and I split the homemade pancakes. The girl at the register wrongly told us they were sourdough. They were buttermilk. Any pancake lover could have told the difference. And trust me, we are all pancake lovers. I do admit, these were pretty good for a restaurant pancake. Larger than the plate they come on, a grand 3 stack of hotcakes and caramel (pronounced car-mel) syrup (sir-up) not (care-a-mel sear-up) with whipped butter and strawberries (on the short side) was a cozy way to warm up in the crisp Logan air. Naturally, being fall in Utah, it was 90 degrees F by 11 am even though in the early morning, it was only about 60 and glorious.

Episode 3. Old Grist Mill apple puff pastries. We get these every time we drive to Logan. They are delicious. This time, ours were so fresh that the icing was still running down the sides! MMMMMM boy! That's good eatin.

Episode 4. Lunch. Grandpa and Grandma, who we did eventually find nestled away in the woods, had prepared a dutch oven feast. My Grandpa is quite the character; he owns every size dutch oven but two: the 11 inch and the 13 inch. What makes them different? You would have to ask him that. The straightest answer he gave me is that the odd sized ones are deeper and thicker than the average dutch oven. For this event, I think he used the 22 inch and the 20 inch, or somewhere thereabouts. We had ribs with homemade barbeque sauce, and green beans with bacon. The yellow jackets enjoyed the meal almost as much as we did: they love meat, and the smell of the sweet, meaty ribs drew in a whole colony to the point that J had to scamper off and eat by the fire pit. Uncle and aunt brought fresh veggies, mostly from their garden, and I brought our family favorite chocolate cake.

Episode 5. We drove home to Provo after a delightful, hours long, food and laughter filled luncheon and concluded that lunches in the woods are 100 times better than luncheons in restaurants, at least as far as family gatherings go. Dad and J munched on the amazing new bread recipe we created. (more to follow)

All in all, an awesome weekend.

If you need the recipe for this cake know this:  you can't have this recipe and eat it too. If you want it, you'll have to ask for it.  It's a SECRET :)


Saturday, August 18, 2012

Cravin some Artisan


So not long ago, Jared learned to bake the most wonderful bread. We use it to impress all our friends. I even bought a special dutch oven just so we could bake it better (the pan we used previously was too small). Please help yourselves to make this and fall in love. Just like I did. With both Man and his Bread.

No Knead Artisan Bread
slightly adapted from Jim Lahey’s My Bread


Wait time: 2o hours and 30 minutes. But so worth every second 

INGREDIENTS
 
6 cups all-purpose flour, plus more for work surface (bread flour is recommended, but we never have that on hand when the craving strikes)
1/2 t. instant or active-dry yeast
2 1/2 t. salt
2 2/3 c. cool water


 DIRECTIONS
  1. In a large bowl, combine the flour, yeast, and salt. Add the water and stir until all the ingredients are well incorporated; the dough should be wet and sticky. Cover the bowl with plastic wrap. Let the bowl of dough rest 12-18 hours on the counter at room temperature. When the surface of the risen dough has darkened slightly, smells yeasty, and is dotted with bubbles, it is ready.
  2. Lightly flour your hands and a work surface. Place dough on work surface and sprinkle with more flour. Fold the dough over on itself once or twice and, using floured fingers, tuck the dough underneath to form a rough ball.
  3. Generously dust a cotton towel (not terry cloth) with enough flour, cornmeal, or wheat bran to prevent the dough from sticking to the towel as it rises; place dough seam side down on the towel and dust with more flour, cornmeal, or wheat bran. Cover with the edges or a second cotton towel and let rise for about 2 hours, until it has doubled in size.
  4. After about 1 1/2 hours, preheat oven to 425-450 degrees. Place a 6-8 quart heavy covered pot, such as a cast-iron Dutch oven, in the oven as it heats. When the dough has fully risen, carefully remove pot from oven. Remove top towel from dough and slide your hand under the bottom towel; flip the dough over into pot, seam side up. Shake pan once or twice if dough looks unevenly distributed; it will straighten out as it bakes.


  1. Cover and bake for 40-50 minutes. Uncover and continue baking about 5-10 more minutes, until a deep chestnut brown. The internal temp of the bread should be around 200 degrees. You can check this with a meat thermometer, if desired.
  2. Remove the bread from the pot and let it cool completely on a wire rack before slicing.
  3. Enjoy with butter, jam, olive oil and balsamic, cheese, salad, spaghetti sauce, stroganoff, chicken salad, three bean salad, as french toast, with homemade soup, with hot chocolate, or hummus. We have done all this and more. Oh ps. This bread is amazing just by itself, it doesn't need anything else.
We are planning to make this again and again. We have always allowed it to rise the full 18 hours, so of course, it takes careful planning when you start this bread so that you aren't baking at 2 am. Yeah, we've done that too... :)